Small person motivation

I was in the mood to foil on my Scan’n’Cut. I wanted to make something using my favourite Disney range, and which was cheerful.

First, I searched the internet for quotes I like from Winnie the Pooh. I chose ‘even the smallest person can make a big difference’. As somebody who is height challenged, it spoke to me.

I used the Scan’n’Cut Canvas website to type my quote. I chose a simple font whivh would be easy to read. I wanted to emphasise smallest and big, so changed the sizes and the font of smallest. I made sure that the lines of text were centrally aligned.

When I was happy, I used a USB to transfer the quote to my Scan’n’Cut. I foiled it, using a holographic foil, on black card. I wanted the quote to be the main focus on my card, so made it large.

The quote seemed to suit Piglet, so I die cut a wintery Piglet from white card and used my Spectrum Noirs to colour him.

To construct the card, I matted and layered a piece of trimmed down paper from the Simply Creative Chalkboard range onto a piece of Kanban holographic cardstock. I matted and layered thee quote onto holographic catrd, black card, then holographic again and affixed this centrally on a square card blank. I attached Piglet in the bottom left hand corner, slightly overlapping the quote topper.

I decided against further embellishments as the card was already very shiny, and I like the simple layout.

New dies and new papers

Sorry for the delay in publishing this, WordPress has been reminding me for two weeks. I’ve just not felt up to getting photos sorted.

We stayed at my mum’s house on Saturday night which was a nice treat (I got a cup of tea made for me when I got up!). I knew that I had a parcel from Create and Craft waiting at home, but wasn’t sure what, having been a bit overzealous recently with my credit card. I had a play on Pinterest before I went to sleep, looking at idea for the products it might be.

When we got home, I resisted opening my parcel and fed the cat. Temptation loomed, but I put the washing in and put away the overnight bag, then armed with a cup of tea, I opened it.

Today’s present was a 12×12 and an 8×8 paper pad called The Magic of Christmas by Dovecraft and a selection of 7 dies to complement it. The papers are lovely traditional festive colours and imagery, including tartans, stags, Santas and snowflakes galore, and the dies include a stag, a snowflake, bells, music notes and a Noel sentiment. 

I had seen previews and temptations of this paper collection on Kathy Crafts TV’s blog and I thought they looked really warm and friendly, made me want mulled wine and a mince pie while I crafted. I usually like Trimcraft designs, and the quality is always excellent, so I was happy to buy as soon as I saw the price without watching any live demos which is really unusual for me.

At first when I opened my parcel I opened the 8×8 paper pack and spread them over the living room floor. That’s normal if they’re not attached. I then sit and smell them, stroking the pages. His Lordship finds it very odd, and highly amusing, but hey. 

Inspiration refused to come. I stroked, shuffled pages to compare and contrast patterns, hummed Christmas carols and sipped tea. I picked up the dies and put them down. I went to the loo. I put the washing out… Procrastination won.

Then, when sorting through a pile of stamped images and toppers I’ve got ready for when I want a quick make, I found a tag a friend had sent me. It was a clever interactive tag, with a little pocket which holds a smaller piece of card, both attached by a ribbon.

Oooh. I can do this! 

I created a pocket tag of my own. I used the new tartan snowflake paper for the pocket, a piece of Kanban matt gold card for the insert and twine to join the two. I decorated my tag with an image of Santa cut from one of the other papers using my Scan’n’Cut (so proud that I’ve finally learned how to use the direct cut function!) and the Noel sentiment, cut from a piece of the tartan paper. 

When I had die cut the sentiment, I decided to use the negative as well, and to create a full card I also cut the stag from the same piece. I now had a tag, a stag, and the negatives. Along came inspiration.

As you can seen, I’ve been busy. I’ve not touched several of the lovely designs yet. Some are so intricate and beautiful that I don’t want to cut into them, others are ideal for backgrounds and matting and layering and I just haven’t yet used them, but they will get their day.

Update: after a second day creating, I’ve now used some of every single beautiful paper. I’ve accidentally muddled the photos and can’t remember which cards were when

The negative from the stag and Noel worked really well on this lovely music sheet paper

Using the cut stag and Noel. These papers layer so well together

A cute little spinner, with an image cut from one of the beautiful papers that overwhelmed me slightly

I was trying to just use the kit for this, so made the sentiment from one of the papers. I’ve added a single red bead and a piece of twine from my stash

I love the matt gold cardstock from Kanban, it keeps the vintage feel of these papers

I like the concept of this, but the actual finished product isn’t a favourite

A gift tag. Tge sweet little angel was cut from one of the papers

This topper was part of one of the papers which i cut out. I’m really pleased with how these Spellbinders dies frame it

Despite how simple this ius it took me ages. So much measuring, going wrong and remeasuring

Based on one of Kathy crafts TV’s fab demos. I love when Christmas products don’t have to be festive

Yet more cards with my favourite paper pad

As I said in my previous post, I am really enjoying using the Christmas Cheer papers from Simply Creative.

Usually, I find something I love, then new toys arrive in the post – my good intentions of trying to use what I’ve got and not buy new failed spectacularly – and I put the current favourite away and often forget about it. 
In the case of my Christmas Cheer papers, though, I have somehow managed to put the new toys to the side (actually, I don’t know where my build a scene dies went… They got hidden from His Lordship. And apparently me) and keep using the same paper! I have got 6 full sheets of the original 30 left, and my scraps. I’m so proud of myself!

I have to admit that I’ve never yet used up a crafty kit, or a paper pad. If a mini Dawson does come along that’s going to have to change, we so desperately need the space, but this whole making a baby thing is a whole different story (I wish it was as easy and rewarding as making a card; unsuccessful fertility treatment is definitely lacking satisfaction of any kind).

Anyway, I thought I’d show you the cards I’ve made with my papers since my last post.

Simple, scrap busting, using an old free stamp. I really like this one

Showcasing my Little Claire Designs stamped image on another very simple layout

I was going to properly steampunk this up, but I think i like it simple. It might evolve

I do love a shaker card. I used my Trimcraft stag die and used the negative. Another scrap buster.

I love this season’s greetings paper, it looks like ribbon when used in a strip

Dreamees doily die, Kathryn Coyle Little Red Boots stamp and die, and several subtle layers

Does tartan holly work? I do love the tartan stags

Using my current favourite papers

I’ve been using my current favourite papers, a 6×6 pad with vintage style design, Christmas Cheer by Dovecraft. I’ve made several cards, and thought I’d show off the papers.

Using my Kathryn Coyle stamps and an old freebie

How stunning is this paper?

A teensy bit of glitter glue totally changed the feel of this

A previous blog post

Lots of layers and a busy card, but i do like this

Unusual for me, celebrating the white space

The die this is the negative from is free with issue 167 of Simply Cards and Papercraft, love it

Steampunk, Christmas, vintage. Win

This sentiment really is legible in real life

Experiments with new techniques

As I’ve admitted before, my name is Michelle and I am addicted to paper. I have bought two new Christmas paper pads. There may also be two little vintage 6×6 ones which don’t count (essential, honest), as well as a Christmas paper crafting kit, and the papers I bought today.. Oh well, it’s still cheaper than therapy.
Sometimes I find that I love my papers too much, or that I can’t think of ways to use them as backgrounds. I do like using my favourites as the focus of the card, and I showed one of my go to techniques in this blog post

I’ve seen lots of examples of other crafters creating 3d sentiments which stand proud but are cut from the main design. I’m sure there’s a real name for this technique, and I’d be really grateful if anyone could enlighten me. 

One of the vintage 6×6 Christmas paper pads which doesn’t count has been sitting on my desk getting a lot of use. It is Christmas Cheer by Simply Creative. I have every intention of a post to show off the papers (they deserve it, gorgeous designs), but I’m yet to photograph them. 

There is a beautiful poinsettia design in the pad. I love poinsettias, they always make an impression. The images on my paper are small. I have used it as a background, but I thought it would be good to really celebrate the paper, and decided to try the 3d sentiment effect.

First, I had to buy a Christmas sentiment which wasn’t fussy. This was no mean feat! I tried eBay and got bored of looking through nos, The Range had lovely fancy styles , so did Hobbycraft. Feeling a bit despondant I went to The Works and struck gold. I left with Dovecraft Christmas Basics, 7 festive sentiment dies which are lovely and simple.

I made my card front by layering up the same paper, using Kraft card as my mats and layers. I die cut merry and Christmas five times each from kraft card and glued them together. I also cut the words from the middle of my card front, and therefore from the layer below as well. I glued the patterned sentiment on top of the kraft stack, then positioned the stack in the negative space. 

The card looked bland, so I stamped and die cut a stag’s head and placed it in the top left hand corner. I think I like this card, I keep looking at it and wondering whether to add more embellishments, but I think overall it needs to be simple.

I’ve got the blues

I’ve been dragged kicking and screaming into the Instagram arena (hazellovescrafts) . I’m actually quite enjoying seeing reactions to my makes, and I love seeing other people’s projects and getting inspiration.

Heartfelt Creations showed a stunning blue and white card which I liked and commented on (His Lordship was not anywhere near as impressed as he should have been that I figured out how). I thought I may be able to use the idea for a card of my own.

I have a great paper pad called Blue Skies from the Dovecraft Back too Basics range. It’s full of blue papers, a lovely range of patterns including this very feminine vintage-y feel paper I used for my background.

My initial thought was to use some of my Dreamees flower stamps, but the lazy side of me jumped for joy when I found my forgotten stamp and die set from The Works. I stamped three different size flowers, two patterns, in dark blue ink onto pale blue paper and cut out the 15 flowers and used the time I didn’t fussy cut for a cup of tea! All the flowers were shaped using my ball tool and foam mat.

The sentiment is much more soppy than I’d usually pick, but it’s my wedding anniversary tomorrow and apparently I’m feeling the love. I almost never use a focal sentiment, and this was a good challenge for me. It’s a Dreamees stamp.

I chose a textured dark blue card for the sentiment and die cut an oval. I stamped the sentiment centrally on the oval and heat embossed it. I seem to have misplaced my white embossing powder, so it was a gorgeous sparkly one or nothing – the glitter is a tad too big for the writing and it didn’t work perfectly, lesson learned. 

Because the sentiment has a hint of bling, I wanted matt matting and layering, so chose a slightly textured grey card. I like the contrast of the dark blue on it. It actually looks like the blue is sunken on the photo, which gives me an idea for another card.

The oval topper was attached centrally on the card front, then played with the layout of the flowers down the left hand side until I was happy, then I got gluey. There was an ‘and’ on the second to last row, but it really didn’t like the big glitter and didn’t emboss well, so it was hidden under a petal. Finally, I put a silver liquid pearl on the middle of each flower.

Using a new kit

Recently, I fell in love with the Kathryn Coyle Little Red Boots paper craft kit on Create and Craft and after a lot of umming and aahing, I bought it.

When it arrived I have to admit I was a little disappointed by the papers, they were gorgeous, but threre weren’t many and I am finding it much harder than usual to use the toppers, inspiration just won’t come.

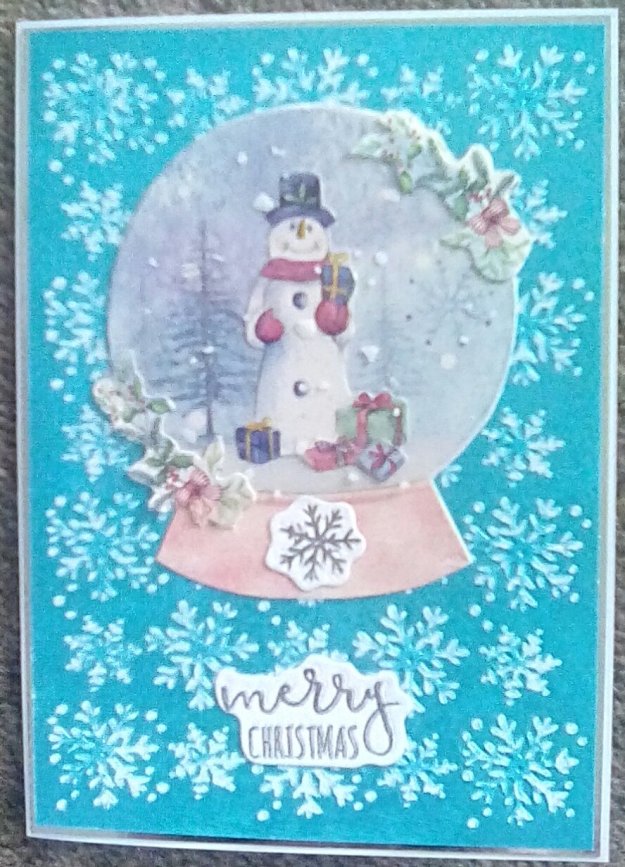
There were three embossing folders in the kit which I love and have used. I made the first card here with the snowflake folder, and the snowglobe decoupage, and I added a piece of snowfall acetate over the snowglobe for detail. 

I also got 23 embossing dies and matching stamps. These are divided into three sets of stampos, three of dies. I have found that I have to cut, then stamp with these which has been confusing, but it looks great.

Back in January, I set myself some crafty goals. One was to improve my stamping and begin to use stamped images as the main card front and not just a topper. I have been practising making masks and have made a couple of toppers I was pleased with which weren’t just a simple stamped image, but that’s as much as I’d done.

The Kathryn Coyle stamps included a fir tree which struck me as an ideal filler for a card front as well as having lots of options to bbe decorated and prettified as a main image. There is also a fox (so cute), a deer, a large standing Santa and a snowman, all of which seemed like a perfect central focus to my card. The fox is a little big for it, one for when I’m feeling braver. 

As you can see, I chose the snowman.

I should have taken photos as I went along to help you follow my tutorial, but I only thought to share it when it was done. Sorry.

How to:

  1.  Cut a piece of white card to slightly smaller than A6. 
  2. Stamp the snowman centrally on the card, and with a small amount of card left below. 
  3. Stamp the snowman again onto a scrap piece of card, a Post it, or proper masking paper (the latter two are easier, they hold in place when you stamp). Cut him out.
  4. Stamp a tree. I started with one to the right of the snowman, in a nice big area of empty card.
  5. Stamp the tree twice  again onto a scrap piece of card, a Post it, or proper masking paper and cut them out.
  6. Use the masks you have made to cover the snowman and the first tree you stamped. Stamp a tree between the first two images, trying to get a different height to the first. 
  7. Carry on masking off the areas you have already stamped and build up as many stamped trees as you want. I wanted a fairly dense forest, so there are 11 trees in my image.
  8. Colour your stamped image as you wish. I used colouring pencils. I added a little grey to the snow to suggest shadow, although this doesn’t show well on the photo. The presents were the brightest bit of my design, but I tried to keep them muted because of the overall look. 
  9. My sky is a dark blue colouring pencil lightly scribbled several times, then blended with water.
  10. Layer your card front onto a piece of Kraft card, again slightly smaller than A6 and attach your card front to an A6 card blank.
  11. Finally, use silver glitter glue to add a few sparkling stars/snowflakes to the sky, and to suggest snow on a few branches of your trees.

 This is a first for me, and I know I have a long way to go, but I am pleased with my creation. His Lordship said ‘mm’ to it with an eye roll, which I’m taking as a compliment!

Christmas is coming…

…The geese are getting fat. My bank account is aware of the presents which have already been bought (especially the ones to me, from me). And I have been making Christmas cards.

I was recently introduced to an amazing  website with incredible prices on crafting goodies. One of my bargains was a 6×6 paper pad called Christmas Cheer by Simply Creative, lovely vintage colours and imagery, including two tartans which are always favourites of mine. I do love a good vintage, wine or otherwise.

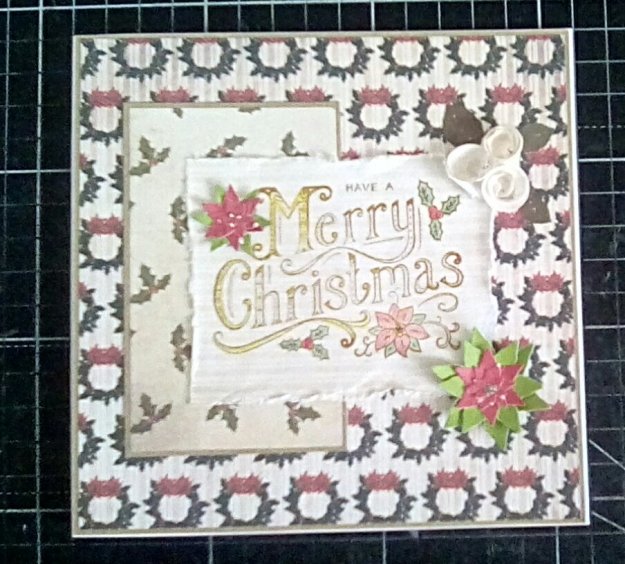
One of the papers is a creamy base with a subtle darker cream stripe. I thought it would be a good base for a stamped image. I dug out an old freebie vintage feel Merry Christmas stamp and used brown ink to keep the theme. I added a very little hint of colour.

I chose two designs from the papers which I felt complemented the sentiment and didn’t drown out the subtle background paper. One of these I cut to be the background, and one to a relatively small rectangle as an accent. I matter and layered both onto Kraft card. The sentiment was distressed, and I didn’t feel it needed matting and layering.

Once I was happy with the placement of the elements, I stuck them down and embellished. I used two poinsettias I had made a while ago using the Fleurs Flower Forming dies and mold (I got some messy points, not sure why, but I don’t mind them too much); one I used to replace a flower on the stamped image, the other disguised the corned I’d ripped when I was distressing the edges. I also used three flowers created from circles, cut into spirals and quilled, accented with leaves cut from my Scan’n’Cut. A little bit of antique gold glitter glue and I was finished.

Playing with new crafty products

I’m sorry it’s been a while since I posted. Real life got chaotic again. My bearded dragon was egg bound and the poor little creature had to be spayed, they found two necrotic eggs when they opened her up. There were lots of vets visits, and then lots of extra hours at work to past for it! Also, we’ve had yet another fertility treatment.

Anyway. I may not have been posting, but I’ve been crafting. And buying. 

One of my purchases was a set of three cut and emboss folders from XCut. There is an elegant lady one, a cottage window, and a steampunk cogs one in my set, although a mistake with mine means I’ve currently not got the window, but have two sets of cogs. All three of these give a cut out frame in the middle of an embossed panel, and some cut out details in the main panel.

The cogs one is my favourite anyway, I do love the steampunk style, it’s so fun to embellish and go all out with.
Gilding wax is one of the few mressy craft products I actually use; the others I love the idea of, and drool over other people’s makes, but they sit on my shelf looking pretty and gather dust. I invested in a new one yesterday, a red bronze Cosmic Shimmer metallic gilding polish which comes with a really useful little sponge in the lid to apply it with. 

I cut pieces of kraft card to fit the embossing folders, and passed them through my Big Shot. I’ve used the folders before and only needed one pass, but my machine isn’t as young as it was, and Kraft card is very fibrous, and I found I actually needed 6 passes to get a really good emboss and all the bits cut neatly. 

Once cut, I got out my heatproof mat to save my work surface (aka carpet) and my new gilding polish, then I put a fairly thin layer of the red bronze polish over, focusing on the raised areas. I also made sure the edges of the apart were coloured.

Now I had two lovely frames, I had to think of how to use the. I’ve got some Tim Holzt stamps which should look good behind them, and some steampunk Christmas stamps, but my mojo was quite low. Back to my trusty kits.

I bought the Kanban steampunk collection ages ago, it is great for quick cards with a bit of a twist. I put my frames against various toppers in the kit, and fell in love with two designs. I picked out complementary backing papers and I was ready.

Both toppers were round, which meant that some of the edge was visible through the cut out bits of the embossed area. I stuck the frames over, then trimmed out the areas which I didn’t want.

I used a very basic, simple design because of how wow the papers were. I cut pieces of the background papers to 121x171mm, and attached the frames central on these. I used a red bronze metallic card stock as a background layer (125x175mm, hollowed out because I can’t get hold of it anymore and it’s my absolute favourite), and I attached the whole card front to 7×5 card blanks. 

One card I made into a birthday card by adding a sentiment from the kit. The image I had used was of a pilot, so I decided to give the impression of a waving flag, or Biggles’s scarf, by bending the sentiment. This one, I added an insert to as well. The second card I wanted as a general greetings card, so I used my Dymo label printer to make what I felt was a fitting ‘hello old chap’.

I love heavily embellishing my steampunk designs, but both of these cards are to be posted and it’s a) expensive and b)  a good test of the adhesive I’ve used. I thought as the background papers were very detailed and so clearly steampunk that just a little twist would suffice. I added an aeroplane charm to the pilot card, and a key charm to the  other card which had locks and keys on the papers.

Finally, but which doesn’t show on the photos, I added glossy accents to the goggles of the pilot, and the gauge of the inventor.

New home cards

My mum asked for two new home cards. One is for old friends of hers, one for new neighbours of known ages. Hopefully you’ll be able to guess which is which.

For this first card, I chose papers from my current favourite pad, a tropical collection which I got from The Works for a whole £1. I wanted classic colours, but with a hint of a modern pattern. I had an antique bronze coloured key charm in my stash, and thought it would be perfect for a new home idea. 

Personally, I tend to prefer making square cards, so this is square, but it would look lovely on a rectangular base too.

I cut my less bold paper to 7mm smaller than my card blank, and layered it onto kraft card (it went who the colours) 3mm bigger, thus leaving a 1.5mm border all around.

The second paper was cut to a square measuring 90x90mm, and layered onto a square of kraft card, allowing a 1.5mm border all around. 

I tied a piece of hemp thread through the key, and used double sided tape to afix it to the back of the smaller square. Then, I attached the small square centrally on the card from, and attached the whole front to the card blank.

 The bow was on and off about 10 times before I decided I liked it, still not 100% convinced, though. 

Finally, I stamped the sentiment directly onto the card. I used a Hunkydory For the Love if Stamps sentiment set, and a black ink.

This second card grew from me finding the image of the gentleman having his diy disaster on the Hunkydory USB 2 which I bought on a whim. He is from the Oldies collection. I thought it would be fun to create a card with another disaster on.

 I was so proud when I remembered how His Lordship had taught me to print, set out off when I went to bed as it takes ages. I broke the printer! HL has managed to do a (very) temporary fix and despite the ink running out as well, it printed! Unfortunately, we’re now in the market for a new printer.

I chose papers which reminded me of 1970s wallpapers and what we’d probably see now as bad taste, likely in a house which needs a bit of TLC and diy. The papers are from my Tonic Studios Simply Patterns pad. I chose a blue base because the topper had printed mainly blue and pink, so I edged it with a blue ink and carried on the theme.

To give the idea of plaster, I used kraft card for my matting and layering. I cut the patterned papers so they each covered half of the card. I stuck the bottom paper down first.

In line with the diy disaster theme, I wanted the card to look like a strip of wallpaper had come off. I carefully ripped a strip 20mm in from the left of the second paper. I stuck the larger piece in line with the bottom patterned paper, then rolled the top of the strip down and glued the strip back in place, the roll showing the ‘plaster’ beneath.

To cover the join in the papers, I used a piece of twine to suggest a dado rail, attaching it behind the card front.

My topper was also matted and layered on kraft card. I wanted to keep the diy theme when I attached it, so I used a brad in each corner to hold it in place. I used a sharpie to draw lines to resemble screws.

Finally, I stamped a ‘new home’ sentiment onto the ‘plaster’, and attached the card front to the card base.